IFSS User Guide
How to search for images.
Flow Diagram
- This flow diagram gives you the idea of the paths that you can select in the software.
-
The basic idea is this:
- You select a single picture, we call this "source image".
- This "source image" is usually compared with one or more images. We call those images "target images" .

Step 0Introduction

- This is the introduction of the system.
Step 1Choose source image

- Click Browse and choose the image you want to look for.
Step 2Choose type of search
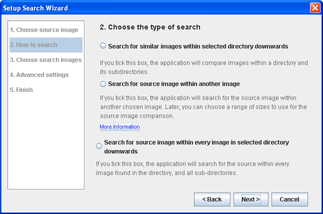
Option 1Search for similar images from a directory and its subdirectories
Step 2bChoose method for searching

- Choose option 1a to search for similar images in detail by splitting each of the images up into blocks and compare the images' blocks.
- Choose option 1b for a less detailed search, choose this option to first posterize the images (to reduce the number of colors) and then compare the images.
- Choose option 1c for a detailed search in which color is not the most important component, choose this option to first posterize the images and then split each of the images up into blocks and compare the images' blocks.
Option 1aUse original images in search
Step 3aChoose the search directory
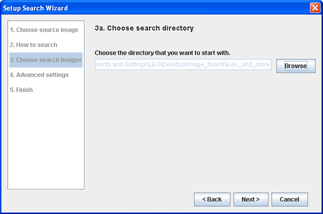
- Click Browse and choose the directory which contains all the images to compare the source image with.
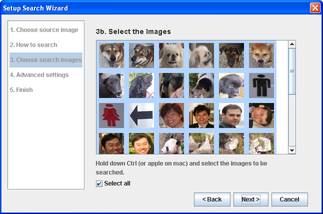
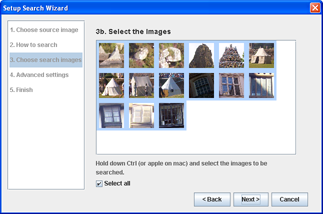
Step 3bChoose the images for searching

- Choose the specific images to search through.
- If you want to search through all of the images in the directory, choose "Select All".
Step 4aAdvanced settings

- Choose the type of color encoding to conduct the search in.
- Generally, HSV gives better results.
- You may also select "Human mode" if you are search for an image with people.
Step 4bAdvanced settings

- Weigh the components according to their importance in the search.
- The standard deviation is how big the range of colors of the image is.
Step 4cAdvanced settings

- Enter the section number and overlapping %.
- The image is cut into sections when being compared. The more sections an image is cut into, the more detailed the search is.
- When comparing two corresponding sections, the colors of the sections determine the similarity. Thus, if the location of colors is important, you may want more sections.
- You may also want the sections to overlap with each other so that colors around the section are taken into account for better results.
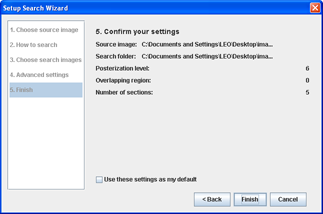
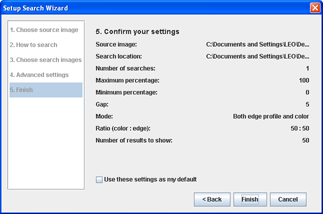
Step 5Confirm the settings
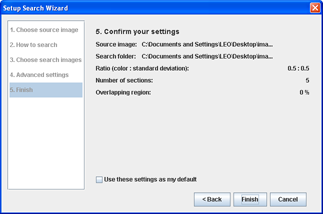
- You may choose to save the settings as the default, so that you do not have to re-enter them next time.
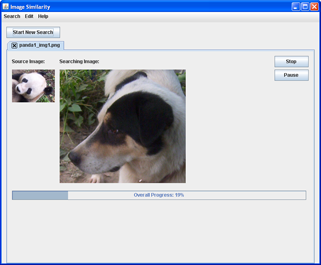
Step 6Run the search
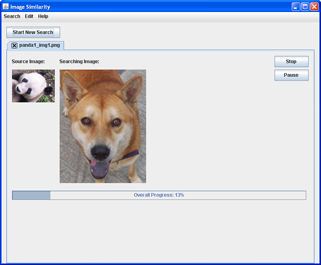
- Wait for the search result. The running time depends on the settings you selected.
Option 1bUse posterized images in search
Step 3aChoose the search directory

- Click Browse and choose the directory which contains all the images to compare the source image with.
Step 3bChoose the images for searching
- Choose the specific images to search through.
- If you want to search through all of the images in the directory, choose "Select All".
Step 4Advanced settings
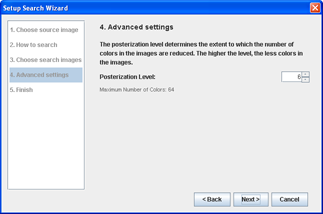
- Choose the level of posterization. The higher the level, the less colors are used in the search, and thus the less detailed the search is. As you change the level, the label updates to indicate the numbe of colors used in the search.
Step 5Confirm the settings

- You may choose to save the settings as the default, so that you do not have to re-enter them next time.
Step 6Run the search

- Wait for the search result. The running time depends on the settings you selected.
Option 1cUse posterized images in a more detailed search
Step 3aChoose the search directory

- Click Browse and choose the directory which contains all the images to compare the source image with.
Step 3bChoose the images for searching

- Choose the specific images to search through.
- If you want to search through all of the images in the directory, choose "Select All".
Step 4Advanced settings

- Choose the level of posterization. The higher the level, the less colors are used in the search, and thus the less detailed the search is. As you change the level, the label updates to indicate the number of colors used in the search.
Step 4bAdvanced settings

- Enter the section number and overlapping %.
- The image is cut into sections when being compared. The more sections an image is cut into, the more detailed the search is.
- When comparing two corresponding sections, the colors of the sections determine the similarity. Thus, if the location of colors is important, you may want more sections.
- You may also want the sections to overlap with each other so that colors around the section are taken into account for better results.
Step 5Confirm the settings
- You may choose to save the settings as the default, so that you do not have to re-enter them next time.
Step 6Run the search
- Wait for the search result. The running time depends on the settings you selected.
Option 2 & 3Search for the source image within other images
Step 3aChoose the image/search directory

- Click Browse and choose the directory which contains all the images to compare the source image with.
Step 3bChoose the images for searching
- Choose the specific images to search through.
- If you want to search through all of the images in the directory, choose "Select All".
Step 4aAdvanced settings

- Choose the number of searches and the maximum and minimum percentages to scale the image to.
- The number of searches represents the number of times the source image is being rescaled to look for a match. For example, if the number of searches is 4, the sizes of the source that are being looked for are 25%, 50%, 75% and 100% of the source's original size, where 0% is the lower boundary (minimum) and 100% is the upper boundary (maximum).
Step 4bAdvanced settings
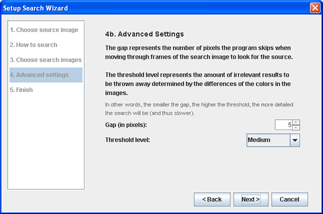
- When looking for the source image within a target image, the application looks through the target image by moving by a certain number of pixels every time to try to find a match.
- The gap is the number of pixels the application moves by.
- Sometimes, a result can be thrown away at this stage already if the differences in colors between the target image and the source image is over the threshold level.
Step 4cAdvanced settings
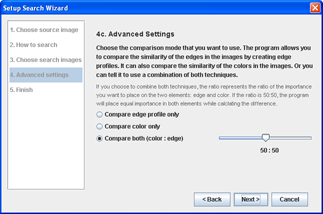
- Besides color similarity, this program also allows you to compare the similarity of the edges in the images by creating edge profiles.
- You may use either color or edge, or a combination of both techniques by weighing their importance.
Step 4dAdvanced settings

- Choose the number of results to display.
- The results are shown in the ascending order of similarity.
Step 5Confirm the settings
- You may choose to save the settings as the default, so that you do not have to re-enter them next time.
Step 6Run the search

- Wait for the search result. The running time depends on the settings you selected.